Neo4j supports LDAP (Lightweight Directory Access Protocol), which allows for integration with Active Directory (AD), OpenLDAP, or other LDAP-compatible authentication services. This means that you use the LDAP service for managing federated users, while the native Neo4j user and role administration are completely turned off.
Note: Integration with LDAP is a Neo4j Enterprise Edition feature
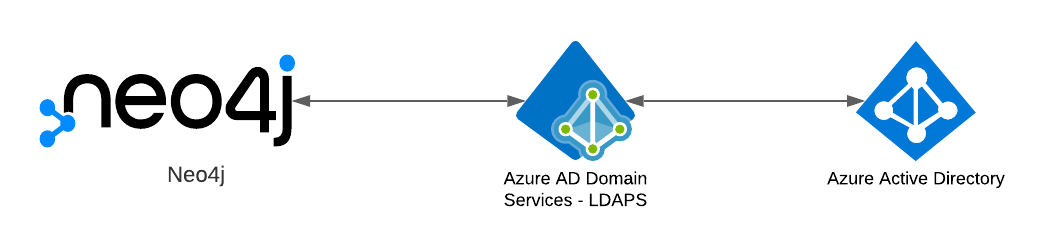
Azure Active Directory (Azure AD) is Microsoft’s cloud-based IAM (Identity and Access Management) solution. LDAP can be used with Azure AD through Azure AD Domain Services (AD DS). Since both of these services are cloud-based, they are managed and simplify operations. By default, LDAP traffic is not encrypted. Hence AD DS can be configured to use Secure LDAP (LDAPS).
There are two important pieces to this; Azure AD DS Configuration and Neo4j Configuration. First we will dive into Azure part. If you haven’t already, create an Azure account.
The Azure Part
Step 1 : Get a domain
Every Azure account comes with a default Azure AD service running to administer users. In order to configure LDAPS, we must create a managed domain in Azure AD DS.
But first we need buy a domain from Azure App Service domains. This is very simple and straighforward, you just need to type in a custom domain name and fill up a contact information form.
Let us say that the domain owned is called myadds.com.
Step 2 : Create and deploy a managed domain service
Now in the Azure portal, search for Domain Services and go to that service page.
Click New to create a managed domain.
The DNS Domain Name is the key field here, which will be a domain name purhcased - myadds.com.
For a quick setup, hit Review + Create to create a managed domain with defualt configuration options (new virtual network, new subnet, sync all users from Azure AD).
For a deeper dive and tuning these options, this tutorial - Create and configure an Azure Active Directory Domain Services managed domain is a great resource.
Step 3 : Configure the managed domain to use
Updating DNS settings
Once the status shows Running, Update DNS settings for the Azure virtual network. This will be shown in the Overview tab for your managed domain as Required configuration steps. Clicking the Configure button automatically configures the DNS settings for your virtual network. The addresses in these settings are the domain controllers for use in the virtual network. You can later find these IP addresses on the Properties tab.
Enabling user accounts for AD DS
Now, we need to change our account password and sign-in again in order to make the password hashes compatible with the AD DS. To change password, Click on top right profile icon > My Microsoft Account > Change Password. You can read more here - Enable user accounts for Azure AD DS
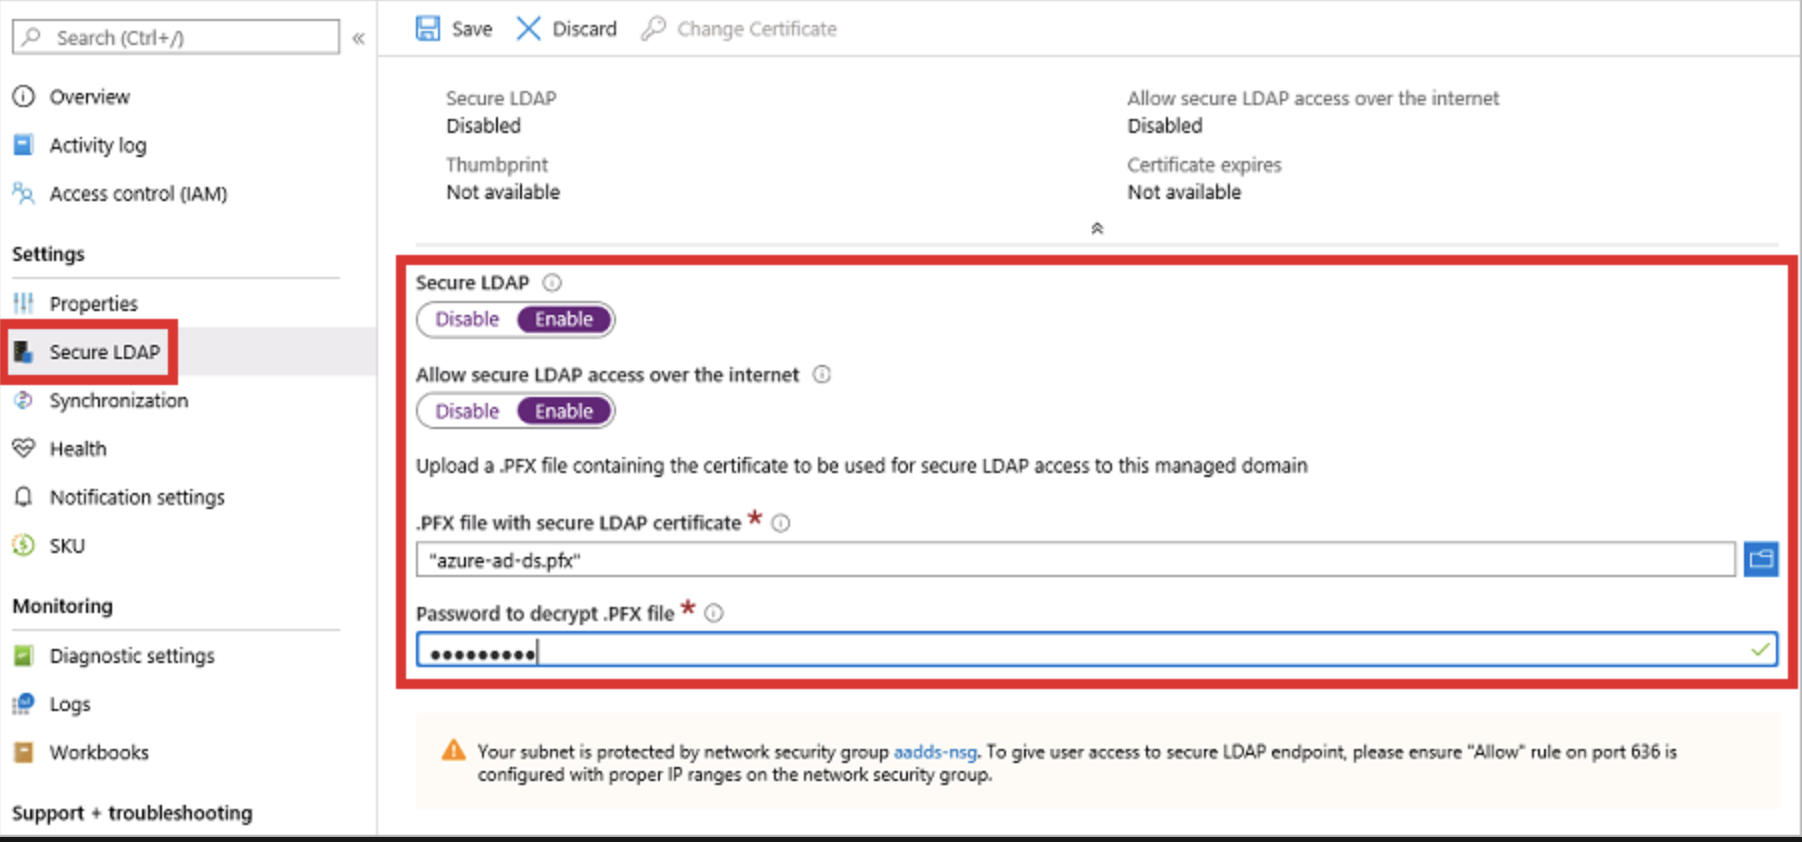
Step 4 : Enabling Secure LDAP
In order to enable Secure LDAP on AD DS, we need to have a certificate file (.pfx) to upload along with its password.
Getting self-signed certificates and a .pfx cert file
For this, I used a CentOS 8 VM on Azure. First, let us create a folder for these certificates.
-
From your terminal,
mkdir LDAPS && cd LDAPS -
We need to check if openssl is already installed.
openssl versionIf this command gives an error, we need to install openssl.sudo yum install openssl -
Once done, we can move forward. We will create an ssl config file for generating certificates.
vim ca_san.confIn this config file, we will specify all the required options we need to get a self-signed certificate for our managed domain.
#ca_san.conf
[ req ]
distinguished_name = req_distinguished_name
req_extensions     = v3_ca

[ req_distinguished_name ]
# Descriptions
countryName=Country Name (2 letter code)
stateOrProvinceName=State or Province Name (full name)
localityName=Locality Name (eg, city)
0.organizationName=Your Company/Organization Name.
1.organizationName=Organizational Unit Name (Department)
commonName=Your Domain Name

#Modify for your details here or answer the prompts from openssl
countryName_default=US
stateOrProvinceName_default=California
localityName_default=San Francisco
0.organizationName_default=Acme Inc.
1.organizationName_default=Engineering
commonName_default=myadds.com
[ v3_ca ]
keyUsage=critical,keyCertSign
basicConstraints=critical,CA:TRUE,pathlen:1
extendedKeyUsage=serverAuth
subjectAltName = @alt_names
#Modify for your details. Must include the commonName in the list below also.
#The *.example.com will allow all Domain controllers with
#the hostname somthing.example.com to use the cert.
[alt_names]
DNS.1 = *.myadds.com
DNS.2 = myadds.com
Notice that commonName_default is our managed domain name and DNS.1, DNS.2 will allow all domain controllers within this domain to use the certificate.
- And now we are ready to generate the certificate files.
openssl genrsa -des3 -out ldaps.key 4096
- We will request a certificate using our ssl conf file.
openssl req -new -x509 \\n-extensions v3_ca \\n-days 3650 \\n-key ldaps.key \\n-out ldaps.cer \\n-config ca_san.conf
- Enabling Secure LDAP on AD DS requires the certificate chain to be in
.pfxformat.
openssl pkcs12 -export -out ldaps.pfx -inkey ldaps.key -in ldaps.cer
This will prompt the user to create a password for decrypting this file. Remember this password.
And now we have ldaps.pfx file which we can upload to enable Secure LDAP on our AD DS.
Deploying the cert and enabling Secure LDAP
As in the image above, go to the Secure LDAp section on your AD DS managed domain.
Click Enable for Secure LDAP and Allow secure LDAP access over internet.
Upload the certificate file, ldaps.pfx and enter the password.
Finally, click Save and Secure LDAP should be configured.
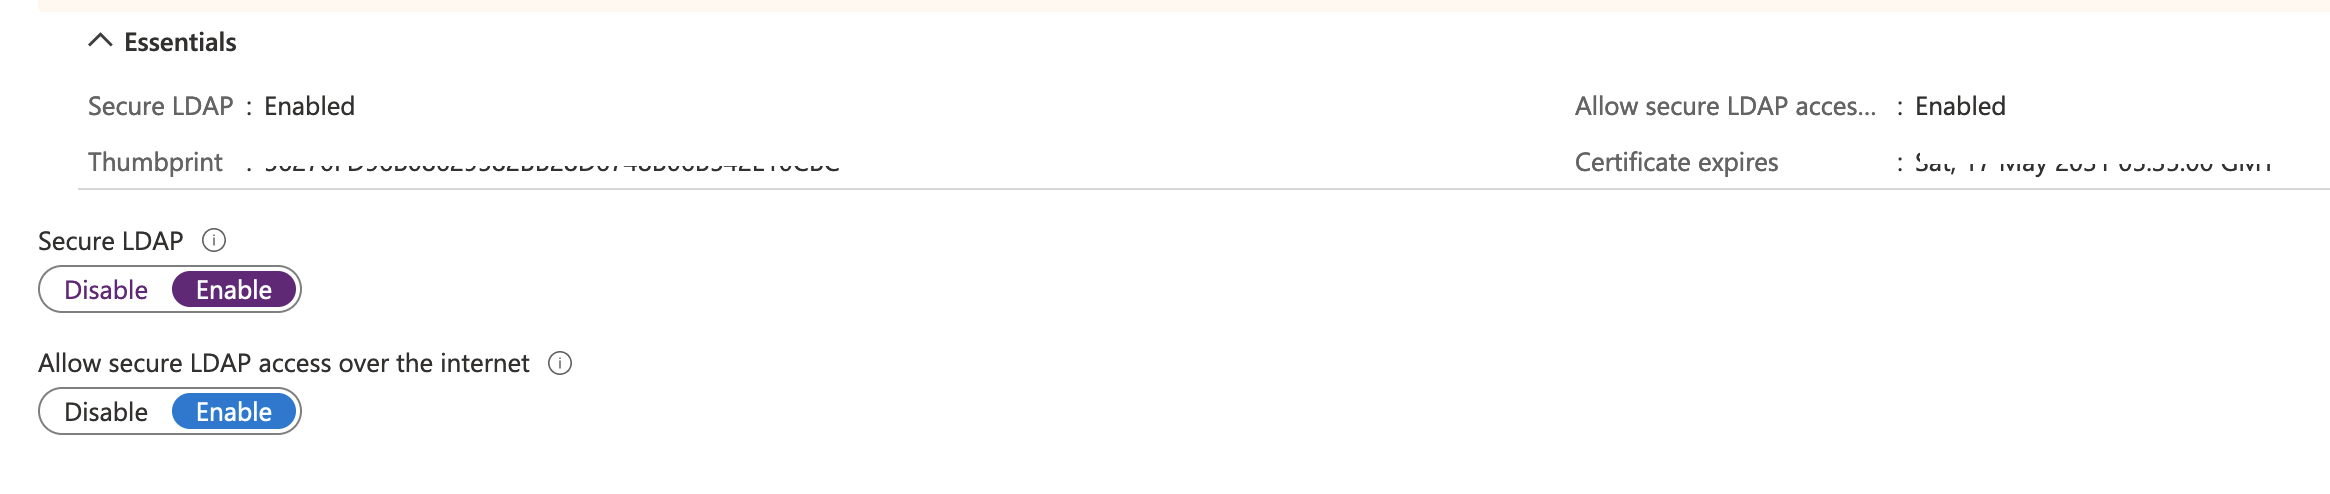
You will see a Thumbprint and Certificate Expiry once configutarion is succesful.
Configuring DNS zone for external access
With secure LDAP access enabled over the internet, update the DNS zone so that client computers can find this managed domain. The Secure LDAP external IP address is listed on the Properties tab for your managed domain. Note this IP address.
In the search bar at the top, search for DNS Zones. You will see our managed domain myadds.com here. Clicking on that will display record sets attached to the domain.
Here, create a record set (say, ldaps.myadds.com) with our AD DS external IP address.
Step 5 : Testing with ldapsearch
ldapsearch opens a connection to an LDAP server, binds, and performs a search using specified parameters.
We will use this command to test our Secure LDAP on AD DS.
Creating test users in Azure AD
- From the Azure portal, search for Azure Active Directory.
- Create some test users, let us call them Jane Doe, John Doe and Bob Doe with usernames janedoe, johndoe, bobdoe respectively.
Testing
- Go to your VM’s terminal and :
ldapsearch -x -H ldaps://ldaps.myadds.com/ -D johndoe@acmecorp.com -W -b 'dc=myadds,dc=com' 'cn=john*'
After you enter the user’s LDAP password, you should see output starting with something like this:
# extended LDIF
#
# LDAPv3
# base <dc=myadds,dc=com> with scope subtree
# filter: cn=john*
# requesting: ALL
#

# John Doe, AADDC Users, myadds.com
dn: CN=John Doe,OU=AADDC Users,DC=myadds,DC=com
.
.
Note the OU and DC, we will need these for configuring our neo4j.conf file soon. You can see also see memberOf property for getting the LDAP group of that user. This LDAP group is then mapped to neo4j roles in the neo4j.conf file.
Before we move to the Neo4j piece, we need to assign these AD users into groups to map them to Neo4j roles. In Azure AD, create three groups; Neo4j Readers, Neo4j Writers, Neoj Admins and put each of the three users into one of these groups. Read How-To here: Add or remove group members using Azure Active Directory
The Neo4j Part
Step 1: Setting up
-
Create a VM on Azure (if you have used one for generating certificates, that one should work too).
-
Open ports
7474,7687,636for your instance (How-to here: Create an inbound security rule) -
Install Java 11 on the VM (latest releases of Neo4j require Java 11 runtime).
-
Install Neo4j Enterprise on the VM. Note: You can do this using instructions above or Azure Marketplace instructions.
-
Add our certificate to the Java KeyStore (jks) repository in the java folder on the machine using your
.cerpublic key certificate which was generated before, when setting up Secure LDAP.
/usr/lib/jvm/java-11-openjdk-11.0.11.0.9-0.el8_3.x86_64/bin/keytool -importcert -alias 'LDAPS Key' -file /home/azureuser/ldaps.cer -keystore ~/trustedcastore.jks
(command will prompt for a password - keep whatever password you want - default is changeit. Let us say the password is yourpassword)
Step 2: Neo4j Configuration file
- Navigate to the installation location in the Neo4j directory and go into the
conffolder. - Make a copy of the original
neo4j.conffile, just to keep a backup. - Open the
neo4j.conffile to make required changes. -
Uncomment this line to accept non-local connections to the server.
dbms.default_listen_address=0.0.0.0 -
Just below that set
dbms.default_advertised_addressto your instance’s IP address. - Uncomment the setting
dbms.security.auth_enabled=falseand change its value totrueto turn on the security feature.
Onto the LDAP configuration settings, find these lines and set them as follows:
-
Uncomment the settings
dbms.security.authentication_providersanddbms.security.authorization_providersand change their value toldap. This way, the LDAP connector will be used as a security provider for both authentication and authorization. -
Configure the LDAP connector The first one is to configure the LDAPS host, which is our DNS for the AD DS.
dbms.security.ldap.host=ldaps://ldaps.myadds.comdbms.security.ldap.authentication.user_dn_template={0}@myadds.com dbms.security.ldap.authorization.user_search_base=dc=myadds,dc=com dbms.security.ldap.authorization.user_search_filter=(&(objectClass=user)(sAMAccountName={0})) dbms.security.ldap.authorization.group_membership_attributes=memberOf -
Map the LDAP groups to the Neo4j roles.
dbms.security.ldap.authorization.group_to_role_mapping=\ "CN=Neo4j Readers,OU=AADDC Users,DC=myadds,DC=com" = reader; \ "CN=Neo4j Writers,OU=AADDC Users,DC=myadds,DC=com" = editor,publisher; \ "CN=Neo4j Admins,OU=AADDC Users,DC=myadds,DC=com" = admin -
Next, we need to point to the Java KeyStore repository and the key file we created in a previous step. Find and configure these settings.
dbms.jvm.additional=-Djavax.net.ssl.keyStore=/home/azureuser/trustedcastore.jks dbms.jvm.additional=-Djavax.net.ssl.keyStorePassword=yourpassword dbms.jvm.additional=-Djavax.net.ssl.trustStore=/home/azureuser/trustedcastore.jks dbms.jvm.additional=-Djavax.net.ssl.trustStorePassword=yourpassword -
Save the file and start Neo4j server. If you are in the Neo4j home folder,
./bin/neo4j startwill start the server.
Step 3: Testing
- Once Neo4j has started, go to your browser and in the URL bar,
<your-instance-ip>:7474/browserwill take you to Neo4j browser. - Log in with the Username and Password for any user from your Azure Active Directory.
-
In the Database information pane at the left, you will see
Connected asand the user with its assigned roles. For example,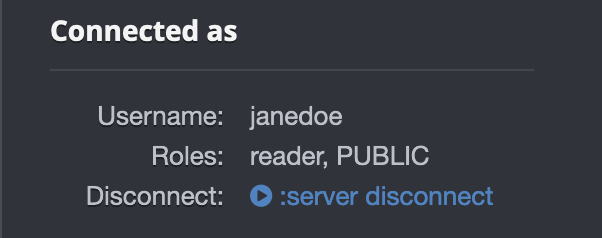
- Try executing a write query with a
readeruser and see what happens!
We have successfully authenticated with users from Azure Active Directory, and mapped AD groups to Neo4j roles to perform RBAC using Secure LDAP.